Workflows in Salesforce are a fantastic way to automate certain business processes. You can create a rule, and based on certain criteria that you set, Salesforce can do a number of things, like send an email, create a task, or update a field. In this blog post, I’ll walk through setting up a workflow rule, using one of Newfangled’s rules as an example.
As you may know from recent blog posts by Chris Creech, we’ve implemented a marketing automation platform that integrates with and complements our Salesforce implementation.
We still use Salesforce to manage sales, and as our main repository for our database of leads and contacts. Marketing automation has allowed us to implement some pretty robust lead scoring rules, which means we now have a way to separate out qualified leads without having to do much manual work on our part.
Things were going great as we reaped the newfound benefits of marketing automation. Lead scoring rules were pushing qualified leads to the top of the list. But one thing was missing—automatic notification. In order to check out these ‘hot’ leads, we had to log into either Salesforce or Act-On. What we wanted was an email notification when someone had hit our ‘hot lead’ threshold.
While I’m sure some marketing automation platforms include this functionality, Act-On does not. But no big deal—I just logged into Salesforce and built a quick workflow to send out an email.
A note before we dive in: Remember that while this blog post was inspired by a particular need in our company to create a very specific workflow, you can create workflows in Salesforce based on an update to any field, and have those rules trigger many different types of actions. In addition to the rule I’ll describe here, we have a number of other workflow rules running in our Salesforce org.
Also be advised that workflow functionality is only a standard offering for the Enterprise and Unlimited editions of Salesforce.
Creating a workflow rule
A workflow in Salesforce is a great way to automate business processes. In order to create a workflow rule, you need 2 things:
- Criteria that cause that rule to run (in this case, when a person’s lead score hits a certain number)
- Actions that execute when a record matches the criteria (in this case, an email alert)
Navigate to Your Name > Setup > App Setup > Create > Workflow & Approval > Workflow Rules.
Select “New Workflow Rule” and then select the object you want the rule to apply to. We are interested in leads.
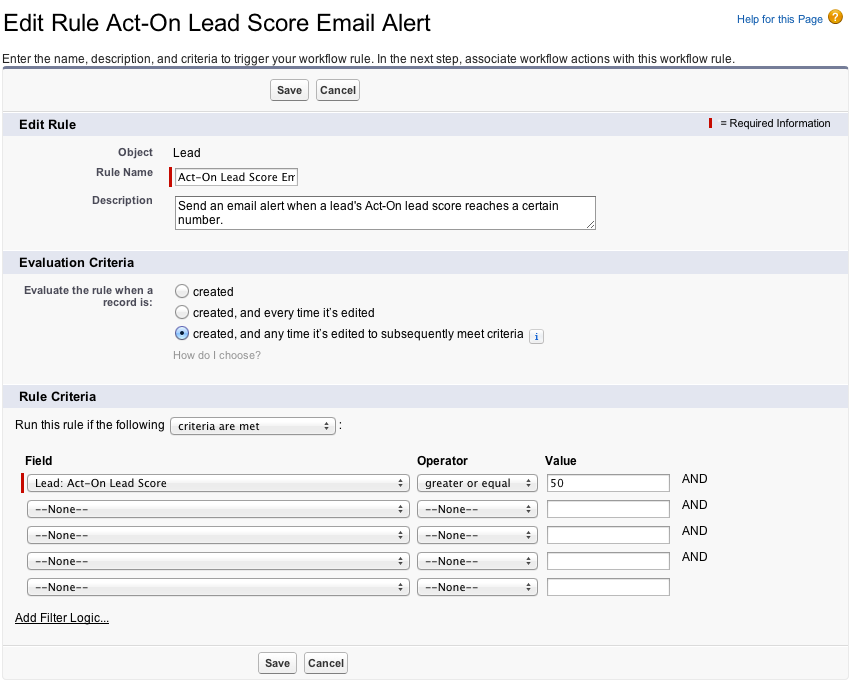
Name your rule, and give it a description. I named my rule “Act-On Lead Score Email Alert,” and described it thusly: “Send an email alert when a lead’s Act-On score exceeds 50.”
Next, decide on your evaluation criteria. There are 3 options here.
Salesforce will evaluate the rule when a record is:
1. created
2. created, and every time it’s edited
3. created, and every time it’s edited to subsequently meet criteria.
The first option will only check if the rule applies when the lead is created, which means it will ignore updates to existing leads. This definitely doesn’t apply, since we want our rule to apply to existing records.
The second option means that if the rule criteria is met, the rule will run, no matter what. Say we have a lead whose lead score is greater than 50. The rule will run when the record is edited to show that the lead score is above 50, but the rule will also run every single time that record is edited for any reason and the lead score is still above 50. This will result in an email about that lead, even after it’s already been determined that they’re a hot lead.
The third option means that the rule will run if a new record is created that meets the criteria, or if an existing record is changed from not meeting the criteria to meeting the criteria. This is the best option for our rule. If a hot lead is added as a new record, we’ll receive an alert. If a record is subsequently updated to have a lead score over 50, we’ll receive an alert only once that happens.
Next, set your rule criteria.
We’ve chosen:
- Field: Act-On Lead Score
- Operator: greater or equal
- Value: 50
You can choose to add filter logic here, if need be. Perhaps in the future we will only want an email kicked out for leads who have an email address at a company. We would add another criterion that ignores emails from Gmail, Yahoo, etc. and then we would add ‘AND’ filter logic so that both of those criteria have to be met for the rule to run.
Here’s our finished rule:

Setting up workflow actions
Now that you’ve set up your rule, you need to specify the workflow actions that the rule will trigger. On the detail page for your rule, there will be a section called ‘Workflow Actions’—clicking Edit, and then Add Workflow Action, will present you with a dropdown menu of the actions available. I won’t go through the details of setting up each of these specific actions, but I’ve included the link to the Salesforce Help & Training document for each, in case you need further instructions.
- New Task
- New Email Alert
- New Field Update
- New Outbound Message (this action allows you to send a SOAP message with field values to an endpoint such as an external server)
- Select Existing Action (this action allows you to use workflow actions you’ve created for other workflow rules or approval processes to be associated with your new rule)
Setting up an email alert
I will briefly outline how to set up an email alert, as that is the action our scenario requires.
Before selecting ‘New Email Alert’ from the workflow action dropdown menu, you will need to set up an email template in Salesforce.
To do this, navigate to Setup > Administration Setup > Communication Templates > Email Templates. Click ‘New Template.’
Choose the type of template you want to create. There are four types of templates available:
- Text
- HTML (using Letterhead)
- Custom HTML (without using Letterhead)
- Visualforce (Visualforce is a native Salesforce development framework, which includes its own markup language that is similar to HTML)
Above the text box that says ‘Step 2. Text Email Template…’, note the section that says ‘Available Merge Fields.’ From this section, you can select fields from any object to be included in your email template. When the email is sent, these fields will be replaced with information from the designated records.
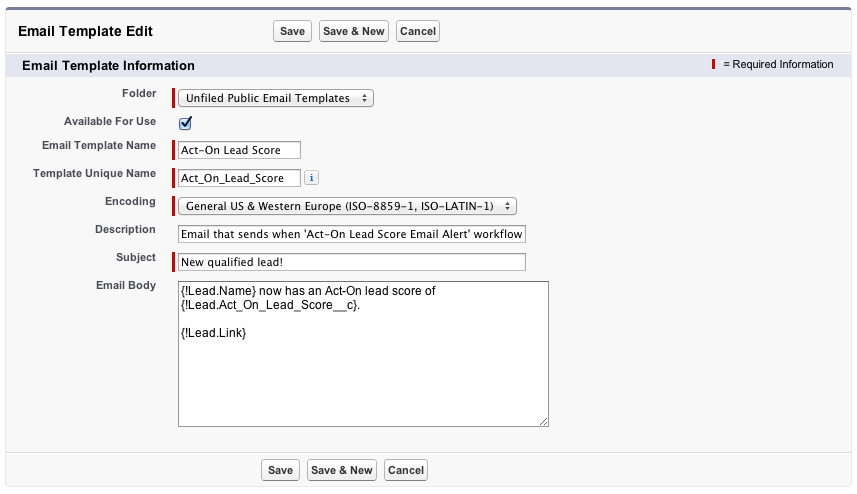
Here is what our email template looks like:

As you can see, we’re using merge fields to populate the email with the lead’s name, Act-On Lead Score, and a link to the lead record so that the reader can navigate to that lead from the email.
Once your email template is set up, you can finish setting up your workflow action.
Once again, navigate to the the detail page for your rule, and in the section called ‘Workflow Actions’—click Edit, and then Add Workflow Action, and select ‘New Email Template’ from the dropdown.
Enter a description for the email alert; ours is ‘new qualified lead.’ Choose the email template you set up previously. Select one or more of your Salesforce users to receive the email, and add any additional outside email addresses that should receive the alert to the ‘Additional Emails’ field. Choose your ‘From Email Address’ and then hit Save.
Activating your workflow rule
The last step in the process is to activate your rule. On the Workflow Rules landing page, find the name of your new rule. To the left, there should be three links: ‘Edit | Del | Activate.’ Click ‘Activate,’ and you’re finished!
How have you used workflow rules to automate your business practices? Let me know in the comments!


